Pushing Left, Like a Boss – Part 6: Threat Modelling

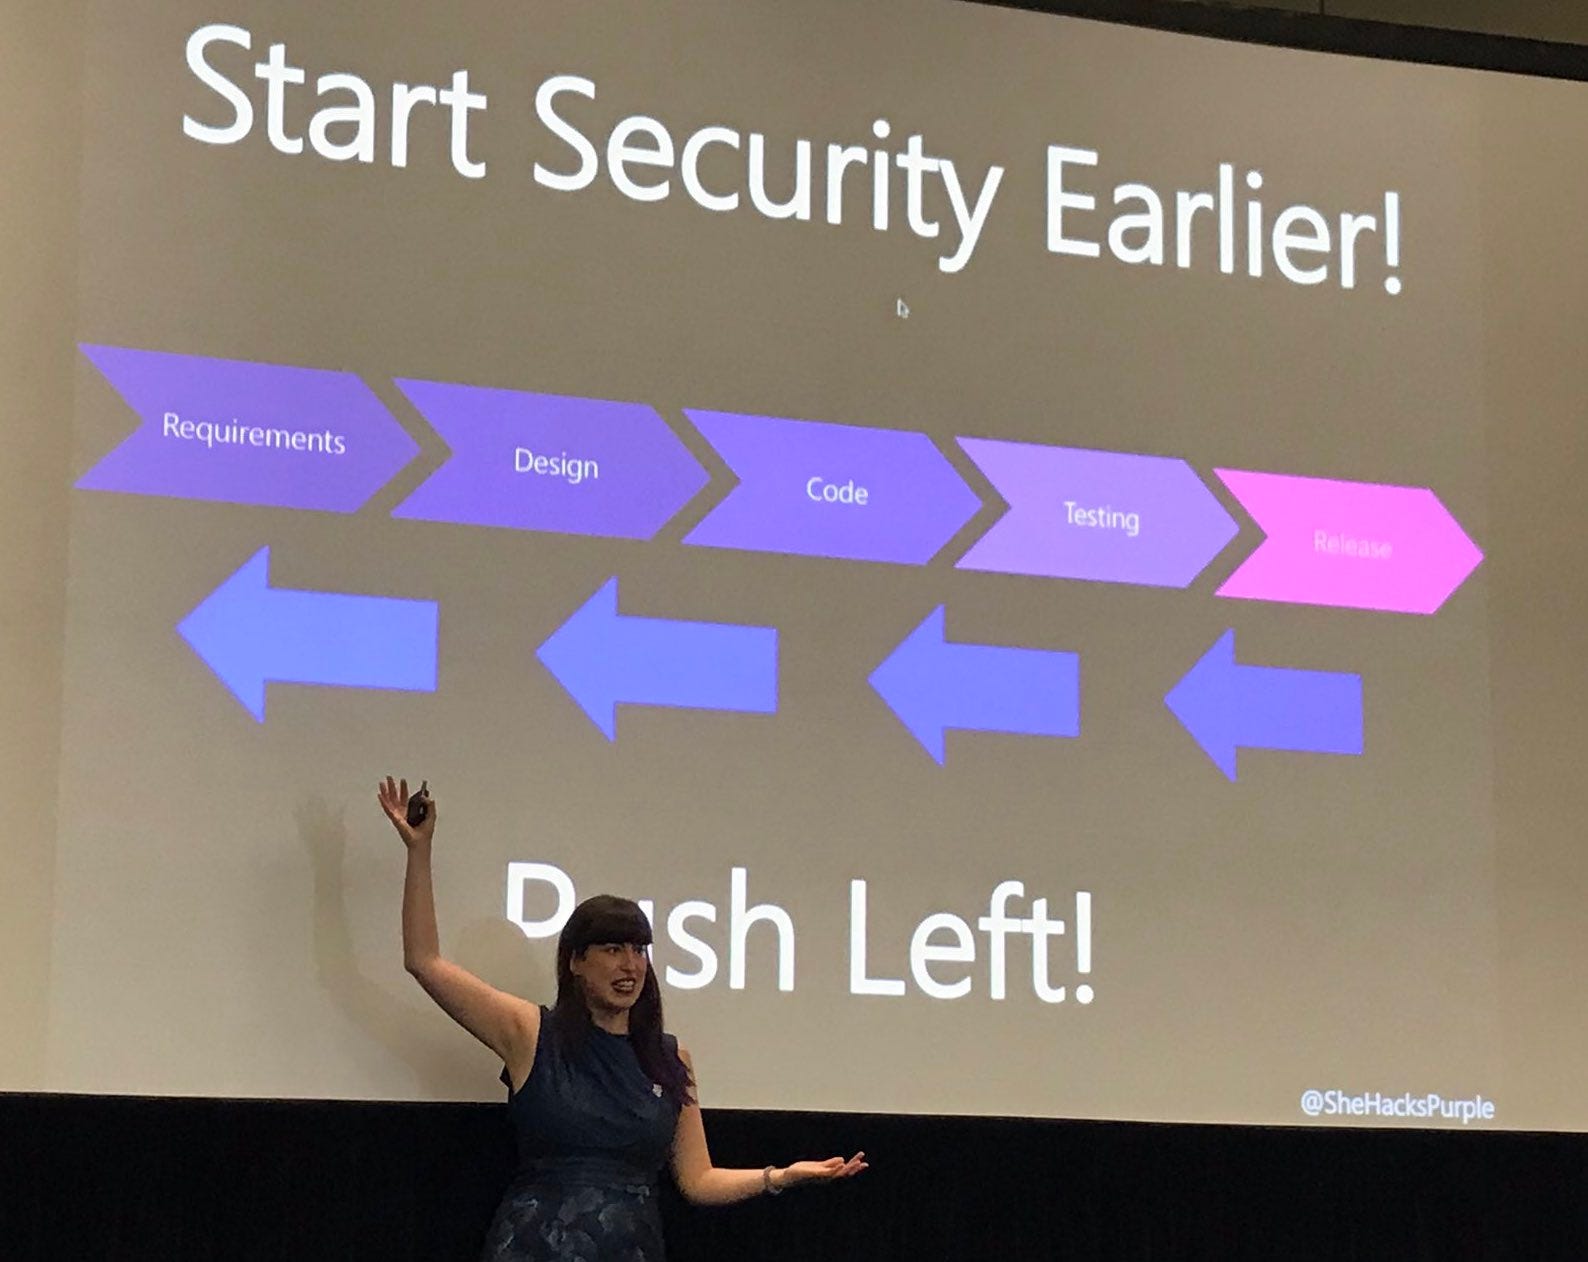
The last security-related part of the Design Phase of the System Development Life Cycle (SDLC) that we will talk about in this blog, is threat modelling, affectionately known as “evil brainstorming”.

Threat modelling happens during the design phase of the system development lifecycle.

The purpose of threat modelling is to discuss the possible threats to your system, then to do your best to mitigate them, and if not, to manage or accept the risks. There are multiple formalized methods for doing this, which I will not discuss here, each one already has its’ own book, advocate or dedicated blog, likely doing a better job detailing it than I ever could. In fact, my friend Adam Shostack, wrote an amazing book about it. Check it out!

That said, dear reader, I want you to understand why threat modelling is important, who needs to do it, as well as when and how you can start.

In order to create a threat model, a representative from each project stakeholder group needs to be present, this means someone from the business/someone representing the customer, a security rep, and someone from the development team. Yes, someone from the tech team needs to be there; they often have the most-frightening threat ideas!

Then you discuss what the risks are to the system. “What keeps you up at night?”, “If you were going to attack your app, how would you do it?”, “What threat actors should we be aware of? Should we prepare for?”, etc. You want to look at the system from the viewpoint of an attacker, what could go wrong? How could the system be misused? How can we ensure we protect the user (including from us)? What is the worst-case scenario? This session can be incredibly formal (creating attack trees, for instance), or quite informal (which is how I would suggest you start, if you have never done one before). You can read about two informal threat modelling sessions I documented on my blog; Serverless with Bryan Hughes and Robots with Jesse Hones.

Once you have a list of concerns, you will need to evaluate which ones are more (or less) likely and which may require security testing of your app (to see if it is vulnerable or not). You also need to evaluate which ones matter more or less; not all risks are created equal. You may be surprised (and frightened) by the justifications for the value of each risk; recently I had to deliver the news that the potential damage was “absolutely catastrophic”. Even though the risk itself was ‘fairly unlikely”, the project team changed their course of action immediately once they understood the potential long-term ramifications.

When you have your list of risks, and how much each one matters, you need to plan. Will you mitigate (fix/remove) some of the issues? Will you manage some, by keeping an eye on them to see if they get worse? Will you accept some of the risks? Perhaps some are highly unlikely or pose only a tiny threat? Why spend funds on something that is not worrisome?

The entire process should be documented, especially the decisions you make at the end, with management sign off. These decisions must be made with management or someone that has the authority to make large decisions like this. A software developer cannot “accept the risk”, nor likely can you as a security engineer; it is probable that you will need a C-level executive to accept risks that are above the level “medium” or “low”.

If you are doing an iterative design, you will need to do several shorter threat modelling sessions, for new features or large changes to existing features. If you are doing a large waterfall-style approach, one thorough session should be enough (assuming no large changes afterward). You will need to decide this for yourself and your org.

I threat model and/or do design reviews all the time, and I really enjoy it. I genuinely feel that the experience I’ve had threat modelling has made me a much better software developer, and likely a slightly more thoughtful person.

If you like what you have read here and want to delve in deeper with threat modelling, I suggest first reading up on STRIDE, and of course read Alice and Bob! After that, using your favorite search engine, look up “OWASP Threat Modelling”, STRIDE, and PASTA, as a start down your new path.

Pushing Left, Like a Boss, Part 5.14 Secure Coding Summary

This article will summarize the previous articles in Part 5 of this series, and is hopefully something that you can use for your organization as a start for a secure coding guideline for your developers.

Secure Coding Guideline

In order to ensure that your developers are following these 
guidelines, code review is recommended.
Tanya the tree hugger
Tanya Janca, hugging a giant tree

I’d like to thank all of my professional mentors and the OWASP volunteers that have taught me about Application Security, that is where and how I have learned the majority of what I know on this topic. Without the OWASP community, and it’s free and vendor-neutral teachings, many of us would not be where we are today. The OWASP community has my unwavering and unending gratitude and support. Thank you.

Special thanks to the following people who have helped me directly in learning these concepts, and so much more: Dominique Righetto, Jim Manico, Sherif Koussa, Adrien de Beaupre, Sonny Wear, Nicole Becher, Chenxi Wang, Zane Lackey and Kim Tremblay. I’d never have gotten this far without them.

If you like this blog series, you will love the OWASP Cheat Sheet project! My favorite OWASP project of all time. Check it out!

Up next in part 6 we will discuss the testing phase of the SDLC, what types of security testing we can do, the approaches we can take, as well as other strategies and phases within the SDLC that we can test our apps.

Do you have any more secure coding principles that you would like to add? Guidance you’d like to share? Please add it to the comments below!

Pushing Left, Like a Boss — Part 5.13 — HTTPS only

HTTPS only — for every app, everyone, always.

Temple in South Korea, 2019, Photo Credit: Bryan Hughes

Temple in South Korea, 2019, Photo Credit: Bryan Hughes

Now that encryption is fast, and free, and we know the risks of not using it, there is literally no excuse not to use HTTPS only for every application on the Internet. Literally every application, even for static pages that contain no sensitive information. For everyone (there is no class of user that does not need protection on the internet). Always (there is no time limit, and you can auto-renew your certificates; you don’t even need to really think about it).

Every public website and web application (including APIs) should force the use of HTTPS (and disallow or redirect connections using HTTP). This can be done using security headers in your code or forced on the server.

There is no reasonable excuse for not using HTTPS only for public-facing applications. Feel free to argue with me in the comments. 😀

Up next we will summarize “Part 5: secure coding” of this series.

Pushing Left, Like a Boss — Part 5.12 — Authentication (AuthN), Identity and Access Control

Note: much of this comes from the OWASP Cheat Sheet on Access Control, by Shruti Kulkarni, Adinath Raveendra Raj, Mennouchi Islam Azeddine and Jim Manico. And if not, it may come from one of the other offerings from the amazing OWASP Cheat Sheets Project. For more information on almost any AppSec topic, check out the project, it’s definitely worth your time!

B-Sides Vancouver, 2019

B-Sides Vancouver, 2019

Let’s start with some definitions.

Authentication is ensuring that the user who is using the application is the actual person they purport to be. For instance, when I log into my webmail, it verifies that I am the one-and-only Tanya Janca that owns this account. Not a different person who is also named “Tanya Janca”, and not someone pretending to be me. The real, authentic, me; the person who owns the account.

Identity (digitally speaking) is a hardware or software-based solution for proof of identity of citizens, users or organizations. For example; in order to access benefits or services provided by government authorities, banks or other companies in person, you must verify your identity, usually with a driver’s license, passport or another physical document. However, if you are verifying your identity digitally (electronically), you must use a software or hardware based solution to prove your identity.

Access Control is allowing (or not) users to access systems, features, data, etc. based on the permissions that the system has assigned to that user. For instance, perhaps you have access to the main parts of your building, but there is an electrical room to which you do not have access. Your badge will not get you it. This is access control, and it works the same way with software, granting or restricting access based on your role and/or identity within the system.

As usual, I recommend using the features as provided in your programming framework for AuthN, Identity and Access Management features. I also suggest strenuous testing of your implementation, because if someone breaks these security controls there shall be dire consequences.

General Rules of Authentication (AuthN)

  • Applications that use password-based authentication should follow the standards put forth in my book, Alice and Bob Learn Application Security and/or the current NIST Password Standard. Ex: do not forces users to change their passwords often, allow very long passwords, do not force complexity, allow and encourage the use of password managers, etc.
  • The principle of least privilege is the practice of limiting access to the minimal level that will allow normal functioning. This principle should be applied not only to the users of web applications, but to the applications themselves, and as they are given access to databases, web services and other resources. For example, it is rare that an application requires a database user that is the database owner (DBO); generally, read/write or CRUD is enough.
  • Passwords will be salted and hashed (one-way), not encrypted (two-way), before storing. Use a strong hashing algorithm (again, refer to my book, Alice and Bob Learn Application Security or NIST if you are unsure).
  • Passwords will be encrypted in transit (HTTPS only).
  • Re-authentication will be performed for “Sensitive Features”. Sensitive features could include, but are not limited to; changing passwords or security questions, changing bank account information, deleting a user account, transferring large sums of money.
  • Measures must be taken to prevent or circumvent brute force attacks. Measures could be a maximum number of login attempts, requiring a captcha after 5 failed logins attempts or throttling (slowing down) the system to make a brute force attack more difficult.
  • Passwords must be masked (not echoed to the screen) while the user enters the password.
  • Validate that a user is authorized to access every new page and for every action. Ensure that this is applied using a pre-approved list of approved users, not a block list of unapproved users. See blog post Pushing Left 5.1 for more information on input validation and approved lists..
  • Never assume that “hiding” a page or feature means that it is protected or ‘safe’, that is not enough.
  • Login fails and errors should be logged. Ensure not to log sensitive information such as the text used for the attempted password, as it is likely only one or two characters off from the real password. Refer to blog post Pushing Left 5.9 for more information on what to log.
  • Brute force attempts (defined as 10 or more successive failed attempts to login in under 1 minute, or 100 or more failed attempts in one 24-hour period) must also be logged. If possible, the IP address of said attacker should be blocked, and account owner notified.

I realize that this list is not exhaustive, as this is a huge topic that could easily fill an entire book. I invite you, my readers, to provide more thoughts, topics and ideas in the comments section below. Thank you for reading.

Up next in the ‘Pushing Left, Like a Boss’ series: HTTPS only.


Pushing Left, Like a Boss — Part 5.11 — Authorization (AuthZ)

Authorization (also known as ‘AuthZ’) is verifying that the user who is trying to perform an action within your application is allowed (is authorized/has permissions) to use that functionality. For instance, is the user an admin user? If so, allow them to view the admin page. If not, block access.

There are several different models used within our industry for authorization, with RBAC (Role Based Access Control) being the most popular. RBAC means assigning people different roles in your system(s), just like people play different roles within your organization, and give them access based on the role they are assigned.

For instance, meet Angela, a hypothetical software developer who is new to my project team (pictured below).

#WOCTechChat: Angela the Software Developer

#WOCTechChat: Angela the Software Developer


As a software developer Angela is going to need access to all sorts of things; source control, perhaps permission to publish to the CD/CI pipeline, and various file systems.

Now look at the second image to see our project team: Sarah, Angela and Jennifer. A project manager, software developer, and a database administrator (DBA). They all play different roles within the project and our organization, so they need different sets of permissions and access. Angela the software developer should not need Database Owner (DBO) permissions, but the DBA definitely will. The project manager is unlikely to need access to the web server.

This is where Role-Based Access Control (RBAC) is extremely helpful, the system administrator can easily assign the proper roles to each of our project members, to ensure they are only authorized access to the things they need to get their jobs done (least privilege).

Project manager, software developer, and DBA, Photo Credit: #WOCinTechChat

Project manager, software developer, and DBA, Photo Credit: #WOCTechChat

When writing code for authorization within applications, use the features in your framework, and re-verify access for every feature and/or page of your application. Test your implementation thoroughly, with each role, for best results.

This is something that is often gotten wrong by software developers, which can cause huge issues, so please take care to do thorough testing.
For a deeper dive into this topic, check out the OWASP Cheat Sheet on Authorization Testing Automation, by Dominique Righetto.

Up next in the ‘Pushing Left, Like a Boss’ series: Authentication (AuthN), Identity and Access Control.

Pushing Left, Like a Boss — Part 5.10 — Untrusted Data

Trust data from…. No one. Not the database, not APIs, not even your mom.

Sydney, Australia, at #MSIginiteTheTour — I’m the tiny dot at the front

Sydney, Australia, 2019. I’m the tiny dot.

Any data sent to your application needs to be treated as untrusted, and thus validated before it is used or saved. When I say this, I mean ALL DATA. Whoever saved the data to that database may have made an error while validating that input. The API you are calling may have been compromised. Even a highly intelligent user, such as my mother (degrees in both chemistry and mathematics, an accounting designation, and several certifications, including adult education – She’s very bright.), could make a simple error when using an application, such as entering a single quote instead of a double quote, which could potentially send your application into an error state, causing a crash or worse. I realize that generally we assume that we are guarding against only malicious actors, but this is not true: even well-meaning, well-educated and computer-literate users can cause problems if your application is too trusting of the data it receives. If you treat all data as potentially malicious you will ensure that your application is not only battle-ready, but also error-proof.

Validate data from all sources, including:

  • Parameters in the URL
  • The database
  • APIs (internal and external)
  • Other Applications
  • Anything from the user. Especially the user.

References: Check out the OWASP Cheat Sheet for Input Validation!

Up next in the ‘Pushing Left, Like a Boss’ series: Authorization (AuthZ).

Pushing Left, Like a Boss — Part 5.9 — Error Handling and Logging

All errors should be caught and handled gracefully; there should never be a stack trace or database error on the screen. Not only so that we look like professionals, but so that attackers are not given extra information to use against us when creating their attacks. When errors happen, an application should never fail into an unknown state, it should always roll back any transaction it was performing, and ‘close’ anything it may have opened. Such a situation should also always be logged, so that if an incident were to arise incident responders would have something to work with when they investigate, and so that auditors can verify that the system is and has been working correctly.

In Hong Kong, at “The Peak”.

Errors:

  • All application errors must be ‘caught’ and handled, they can never be left ‘unhandled’.
  • Having a catch-all mechanism (global exception handling) is highly advisable, to ensure unexpected errors are always handled properly.
  • Internal information, stack traces or other crash information should never be revealed to the user or potential attackers.
  • Error messages should reveal as little as possible. Ensure they do not “leak” information, such as details about the server version or patching levels.
  • Do not reveal if it is the username or password that is incorrect if there is a login error, as this allows for username enumeration.
  • Always “fail safe” or “fail closed”, do not “fail open” or to an unknown state. If an error occurs, do not grant access or complete the transaction, always roll back.
  • Security-related errors (repeated login fails, access control failures, repeated server-side input validation failures) should issue a system alert. Ideally, log files will feed into an intrusion prevention/detection system or an application SIEM. This can be tested by running a vulnerability scanner against your application, it should cause events that trigger logging.

What and When to Log:

  • System logs must not contain sensitive information.
  • Login fails and other login-related errors should be logged.
  • Brute force attempts should be logged (defined here as 10 or more successive failed attempts to login, in under 1 minute, or 100 or more failed attempts in one 24 hour period).
  • All security related events. Examples: a user being authenticated, a user being locked out after several failed login attempts, an unaccounted-for error, anything the global exception handler catches, input validation errors.

The following information must be contained in your logs:

  • what type of event occurred (why this event is security-related/name for event),
  • when the event occurred (timestamp),
  • where the event occurred (URL),
  • the source of the event (IP address), **
  • the outcome of the event, and
  • (if possible) the identity of any individuals, users or subjects associated with the event.

** If the IP comes from X-Forwarded-For header do not forget to properly validate it, as it could have been tampered with. Special thanks to Dominique Righetto for this point! **

You can, of course, log more than what is listed here.

More of Hong Kong, a place which is unlike any other.

Using and Protecting Your Logs

  • Log files and audit trails must be protected, even the backups.
  • Ideally logs are all saved into the same space, in the same format, to be easily consumable by a SIEM or other security tools.
  • Only authorized individuals should have access to logs.
  • Logs should be stored in an encrypted format.
  • Logs should be accessible by your incident response team.
  • Logs should be stored on a secure server or other secure area.
  • Log files must be incorporated into your organization’s overall backup strategy.
  • Log files and media must be deleted and disposed of in the same way you would dispose of any sensitive information.

For more information on this topic the new OWASP Top Ten (2017, Item #10) contains detailed advice on this topic.

Reminder; never log Personally Identifiable Information (PII) or anything else sensitive such as SIN, passwords, or dates of birth.

For more detailed information on this and so many other application security related topics please check out the extremely helpful “OWASP Cheat Sheets” project.

Pushing Left, Like a Boss — Part 5.8 — Securing Your Cookies

The previous article in this series is 5.7 URL Parameters.

Continuing on our long trek through secure coding principles we have come to the topic of cookies, which are used for sending information back and forth from the client and server.

In order to secure the decision-making and/or sensitive data that we need to pass between the client and the server, we need to put in a secure cookie. Secure cookies are encrypted, not encoded, which means someone needs a key in order to decrypt, change or reveal the information that they contain. In the case of secure cookies, that key is stored on the server (a secure location). Anything that is sensitive, used for decision-making within your application, or is otherwise inappropriate to put in a URL parameter or a hidden field, should be passed in a secure cookie. This includes, but is not limited to:

• Session IDs
• Tokens
• Account numbers
• Dates of Birth

You get the picture.

You do not need to secure all your cookies/information. If they deal with user preference for layout, language or font sizes, this is the sort of information that is unlikely to need to be protected. Your business analyst or clients can guide you on what is or is not sensitive.

My friend Imran A Mohammed and I, #Null Singapore 2019

My friend Imran Mohamed and I, in Singapore, at the Null Meetup

The following settings should be used, as a bare minimum, to ensure your cookies are secure:

· Use the ‘secure’ cookie attribute when you send cookies.
· Use the HTTP Strict Transport Security Header or set the web servers to force HTTPS traffic only.
· Use the HttpOnly security header to block cookies from access attempts from client-side scripts

Note: Read Alice and Bob Learn Application Security to learn about alllllll of the possible cookie settings.

Up next in the ‘Pushing Left, Like a Boss’ series: Error Handling and Logging.

Pushing Left, Like a Boss — Part 5.7 — URL Parameters

Never put information in the parameters in the URL of your application that are important. When I say “important”, I mean something that would potentially be used to make a decision in your application that is not trivial. The same goes for hidden fields, don’t store or pass anything valuable there either. Important information must be transmitted in a secure manner, and hidden fields and URL parameters are not the place for that.

Risks of putting sensitive information in the URL include; sensitive data being cached, sensitive data exposed in the case of a man-in-the-middle attack, or an attacker potentially injecting their own values.

Examples of things that should not be in URL parameters:

  • User IDs (for a user logging into a system, not when it is used to bookmark a public page, and nothing more. Bookmarks on public pages are not sensitive.)
  • Account numbers
  • SIN Numbers
  • Dates of birth and other combinations of information that could possibly be used to impersonate someone
  • Home address
  • Query or search information
  • Personally Identifiable Information (PII)
  • A token or session ID

Franziska Bühler and I at the Open Security Summit, 2018

Franziska Bühler and I at the Open Security Summit, 2018


Examples of things that could be in URL parameters:

  • Which language the user wants to view the site in, for instance “fr” for French or ‘en” for English. If an attacker switches it, the user will see the same information, in a different language. No harm, no foul.
  • The page number for a form that the user is allowed to see all the pages of and there is no reason that they cannot skip ahead or back in the document or form.
  • Viewing preferences for the form, for instance contrast or brightness settings. Although it would be an inconvenience if an attacker changed the brightness or contrast of a page, the user would not be harmed, nor the application or it’s data.
  • Query terms in a search engine.

Key takeaway: when in doubt, do not pass it in the URL.

Up next in the ‘Pushing Left, Like a Boss’ series: Securing Your Cookies.

Pushing Left, Like a Boss — Part 5.6 — Redirects and Forwards

Recently removed from the OWASP Top Ten, unvalidated redirects and forwards are a sub-set of the problem of poor input validation. If you properly validate all input, including input in the address bar and/or obtained from the user, you will not have this problem.

DevOps Zurich meetup, 2017

DevOps Zurich meetup, 2017

Below is a rehash of input validation, from the viewpoint of using redirects and forwards.

  • Do not use anything from URL parameters to make decisions for your application, and this includes URLs to different sites (redirects and forwards).
  • If you need to use redirects or forwards, if you need to pass this information, do it in a secure cookie.
  • Validate your URLs, just like you would validate any data. Ensure that the supplied value is valid, appropriate for the application, and that the user is authorized to access that URL.
  • The easiest strategy is to avoid using redirects and forwards altogether, if possible.

For further reading, visit the entry for this topic on the OWASP Top Ten 2013 project page.

Up next in the ‘Pushing Left, Like a Boss’ series: URL Parameters.

Pushing Left, Like a Boss – Part 5.5 File Uploads

2. Buy a third party tool to do this work for you.

Start Security Earlier! SecTor 2018

Who wants to ensure our files are safely uploaded?
Swiss Cyber Storm 2017

Pushing Left, Like a Boss — Part 5.4 Session Management

Tanya Janca teaching
As an ex-dev, I know the temptation to write your own. Trust me, don’t.

Open Security Summit, 2018